Pampers and Paklava

  • Home
  • Photography
  • Travel
  • Food
  • Garden
  • Contact

Garden pizza with Pesto and Speck Recipe

June 25, 2014 by Beth Shepherd

Garden pizza with speck americano prosciutto

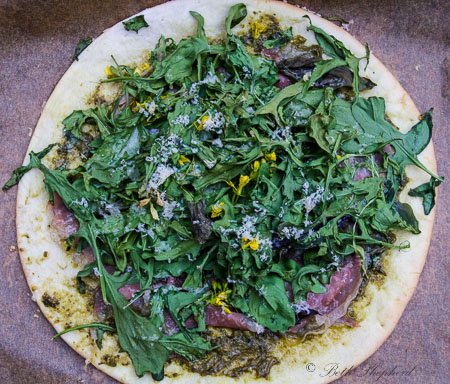
Of late, we have been finding ways to enjoy our garden bounty.  Last week I made gluten-free pizza (Thanks Udi’s!) with pesto (Thanks Cucina Fresca!), applewood smoked speck americano (Thanks La Quercia!), fresh arugula and mustard flowers (Thank you garden!). So simple–exactly what this busy-mom-of-a-toddler needs right now, and delicious. The smoked speck  (a type of prosciutto) added an spectacular depth to our pizza, and proved to be the perfect companion for our spicy garden-fresh arugula and mustard flowers.

Pesto and speck on pizza

Here’s what I did:

  1. Defrosted two (one package) Udi’s Thin & Crispy Pizza Crusts.
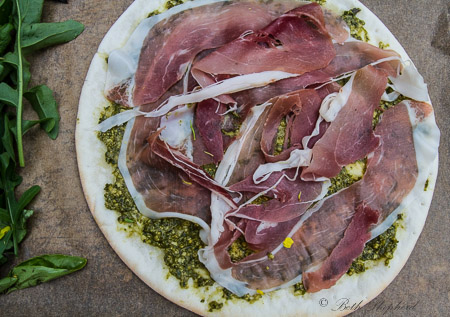
  2. Slathered on a few tablespoons of our Seattle-made favorite pesto by Cucina Fresca.
  3. Placed La Quercia’s applewood smoked speck americano (one package was perfect for two pizzas) over the top of the pizzas.
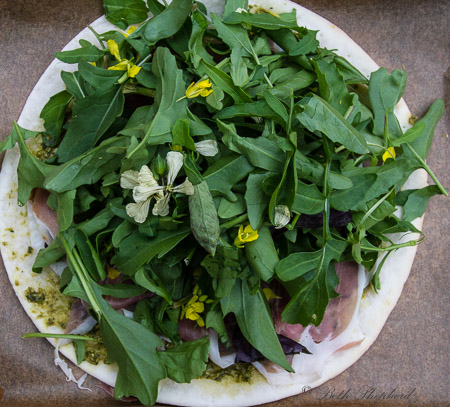
  4. Tossed on (approximately 2 cups, loosely packed) fresh arugula from our garden.
  5. Sprinkled a few mustard and arugula flowers (sometimes I use chive flowers too), also from our garden.
  6. Added a bit more grated Parmesan cheese.
  7. Baked for 7 minutes in the pre-heated oven (350 F). Note: I put parchment paper on a cookie sheet and place the pizza on top of that.

Arugula and mustard flower on pizza

Reveled in the deliciousness with my sweetheart, the pizza, a bottle of rose wine, and a picture-perfect Seattle evening.

Take the road less traveled, Beth

…and check out more yummy foodie posts on Wanderfood Wednesday!

Filed Under: Recipes Tagged With: Cucina fresca pesto, La Quercia Speck Americano, Udi's gluten-free pizza

Stout-Milk Chocolate Ice Cream Recipe

March 13, 2014 by Beth Shepherd

An Irishman is the only man in the world who will step over the bodies of a dozen naked women to get to a bottle of stout.

~Anonymous

Stout Milk Chocolate Ice Cream

Odin's Saga Series Invading Ireland Oak-Aged Stout 2014Beer in your ice cream? You betcha! Ten years ago, I attended a St. Patrick’s Day potluck party. What did I bring? Guinness Ice Cream. How did it taste? Surprisingly delicious: malty, creamy, with a hint of hops. This year I decided to give the recipe a bit of local flair by using Seattle beer (Odin  Saga Series ‘Invading Ireland Oak-Aged Stout’). And, I upped the ante with the addition of Seattle chocolate (Theo Pure 45% Milk Chocolate).

Beer, chocolate and ice cream. A veritable culinary trinity. It’s not Guinness and it’s not green beer, but it sure is good!

Added bonus: You can now say “I’m going for a few scoops,” (Irish slang for  heading off to the pub for a few drinks) and you’ll be right on two accounts.

You can find the complete recipe for Guinness-Milk Chocolate Ice Cream in David Lebovitz’s book, The Perfect Scoop:

Filed Under: Recipes Tagged With: Central Coop, David Lebovitz, Odin Brewing Company, Saga Series Invading Ireland Oak-Aged Stout 2014, St. Paddy's, St. Patrick's Day, The Perfect Scoop, Theo 45% Pure Milk Chocolate

Superbowl Sunday: Smokin’ Seattle Seahwawks Stout Chili Recipe

January 28, 2014 by Beth Shepherd

smoky stout chili with Elysian Dragonstooth stout

Elysian Dragonstooth Stout beerWhat would Superbowl parties and tailgates be without chili? And what would chili be without endless debate: Beans (and which beans)? Pork, beef, or both? Vegetarian? Vegan? Spices (and which spices)?

Then there’s beer. Well, of course, you say. But what about beer in your chili? Absolutely!

Beer will boost your chili. It helps tenderize and add flavor to meat. Or if you decide to go meatless, beer will still take your chili up a notch. I suggest a stout or smoked porter. Both are boldly flavored, malty dark beers that pair perfectly with any chili recipe.

Smoky sausage and smoked paprika are the perfect compliment to this hearty chili which pairs nicely with a full-bodied Syrah or Zinfandel, and–of course–beer (note that Elysian’s Dragonstooth Stout comes in a 22 oz bottle and only 12 ounces is called for in the recipe, which means there’s a bit left over for drinking, assuming you don’t consume the rest of the beer while cooking). I served our chili with more grated Beecher’s Smoked Flagship cheese, guacamole, salsa and sweet potato chips which added a bit of sweetness to balance the smoke and spice.

smoky stout chili cooking

Superbowl Sunday: Smokin’ Seattle Seahwawks Stout Chili Recipe

For the chili:

  • 2 Tbsp olive oil
  • 1 cup sweet white onion, chopped
  • 1 large jalapeno, finely chopped
  • 1 large red bell pepper, chopped
  •  1 lb Andouille or other smoked sausage, raw, removed from casing (roughly 4 sausages, depending on size)*
  • 1 lb ground lean beef *
  • 1-2 15 oz cans beans (optional: some folks like ’em, some don’t)/I chose mixed: kidney, pinto and black beans
  • 4 cloves garlic, minced
  • 12 oz stout or smoked porter (and make that a Seattle Stout, like Elysian Dragonstooth Stout!)**
  • 14 oz diced tomatoes
  • 1 tsp smoked paprika (or as smoky as you like it)
  • 1 tsp cumin
  • 1 tsp black pepper
  • 2 Tbsp Worcestershire sauce (I didn’t have this on hand and it tasted great, so I think you could go with or without)
  • 1 Tbsp molasses, (not black strap)
  • Garnish: chopped chives or cilantro

*This is a meaty chili. You can adjust the amounts to suit your preferences. For my vegetarian friends, you could increase the vegetables (adding whatever suits your fancy) and beans.

**I found that on night #1, the chili–while very tasty–ended up with a bit more liquid than I thought it would. But on night #2, all the stout had been absorbed (and, in my opinion, the flavors had mingled and were more complex). So my suggestions are: make the chili one night ahead and reheat; lower the amount of beer (but why would you want to?); let the chili cook a lot longer than the recommended cooking time; or, accept that your chili will be a bit watery.

For the topping:

  • 1 cup cheddar cheese, shredded (I used Beecher’s Smoked Flagship for more smoky goodness)
  • ½ cup cilantro, chopped
  • ¾ cup crème fraiche, yogurt or sour cream (I prefer the tang of crème fraiche or yogurt, but I won’t keep anyone from their sour cream)

Directions

  1. In a large pot or Dutch oven, heat the olive oil. Add the onion, jalapeno, and bell pepper and cook until onion softens but isn’t browned, about 5 minutes.
  2. Add the sausage and beef, cook until meat starts to brown. Add the garlic, cook for about 30 seconds.
  3. Add the beer, beans, diced tomatoes, smoked paprika, pepper, cumin, and Worcestershire sauce. Allow to simmer for at least 30 minutes or until thickened.
  4. Pour into bowls. Top with cheddar, and crème fraiche.
  5. Garnish with chopped chives or cilantro.

Side dishes for Chili


Serves 4 hungry Superbowl fans.

Take the road less traveled (and GO HAWKS), Beth

Filed Under: Recipes Tagged With: beans, Beecher's Smoked Flagship, chili, Dragonstooth Stout, Elysian Brewery, sausage, Seahawks, smoked paprika, Stout, Sunday, Superbowl

Sweet Potato and Leek Potage Parmentier Recipe

January 22, 2014 by Beth Shepherd

Sweet potato and leek soup

On a cold day (of which, lately, there have been many), there are few things more satisfying than Potage Parmentier. The classic potage (thick soup) is made with potatoes and leeks.

Potage Parmentier was named after Auguste-Antoine Parmentier, and is the moniker used for the hot version of the soup sometimes mistakenly called Vichyssoise (named after the spa town of Vichy), a name that should be used for the cold version of the soup. Soup temperature aside, there is another difference between the two soups: vichyssoise is a smooth and creamy soup, whereas parmentier can either be a rustic, chunky broth (with or without milk), or a rich and silky cream soup.

Whenever I think of potatoes and leeks together, I think of France. Ironically, if not for Parmentier, the potato may have never found acclaim there. Here’s a bit more history (Wiki version) about how Parmentier managed to convince France to open their hearts to the humble “pomme de terre” (apple of the earth):

While serving as an army pharmacist for France in the Seven Years’ War, he was captured by the Prussians, and in prison in Prussia was faced with eating potatoes, known to the French only as hog feed. The potato had been introduced to Europe as early as 1640, but (outside of Ireland) was usually used for animal feed. King Frederick II of Prussia had required peasants to cultivate the plants under severe penalties and had provided them cuttings. In 1748 the French Parliament had actually forbidden the cultivation of the potato (on the ground that it was thought to cause leprosy among other things), and this law remained on the books in Parmentier’s time.

From his return to Paris in 1763 he pursued his pioneering studies in nutritional chemistry. His prison experience came to mind in 1772 when he proposed (in a contest sponsored by the Academy of Besançon) use of the potato as a source of nourishment for dysenteric patients. He won the prize on behalf of the potato in 1773.

Thanks largely to Parmentier’s efforts, the Paris Faculty of Medicine declared potatoes edible in 1772. Still, resistance continued, and Parmentier was prevented from using his test garden at the Invalides hospital, where he was pharmacist, by the religious community that owned the land, whose complaints resulted in the suppression of Parmentier’s post at the Invalides.

Parmentier therefore began a series of publicity stunts for which he remains notable today, hosting dinners at which potato dishes featured prominently and guests included luminaries such as Benjamin Franklin and Antoine Lavoisier, giving bouquets of potato blossoms to the King and Queen, and surrounding his potato patch at Sablons with armed guards to suggest valuable goods — then instructed them to accept any and all bribes from civilians and withdrawing them at night so the greedy crowd could “steal” the potatoes. (These 54 arpents of impoverished ground near Neuilly, west of Paris, had been allotted him by order of Louis XVI in 1787).

The first step in the acceptance of the potato in French society was a year of bad harvests, 1785, when the scorned potatoes staved off famine in the north of France. The final step may have been the siege of the first Paris Commune in 1795, during which potatoes were grown on a large scale, even in the Tuileries Gardens, to reduce the famine caused by the siege.
My Sweet Potato and Leek Potage Parmentier is a riff on the timeless class. Aside from their delicious, slightly sweet flavor, sweet potatoes have many health benefits. They are high in vitamin B-6, calcium, vitamin D, iron and magnesium. And, did I mention how easy this soup is to make? Five ingredients (including the stock, salt and cream).


Fresh sweet potatos and leeks

Sweet Potato Leek Potage Parmentier Recipe

Serves: 6 – 8
Adapted from Julia Child’s Potato Leek Potage Parmentier
Ingredients
  • 3 to 4 cups, or 1 lb, peeled, sweet potatoes, sliced or diced (you could substitute yams, but the soup will be sweeter)
  • 3 cups or 1 lb thinly sliced leeks including the tender green; or yellow onions (but leeks are SO much better)
  • 2 quarts of water or stock
  • 1 T salt
  • 4 to 6 T whipping cream, half-and-half, milk (depending on how rich you want your soup); or, 2 to 3 Tb softened butter
  • 2 to 3 T minced thyme (the classic herbs used are chives or parsley)
Instructions
  1. Clean and dry leeks (which are famous for hiding bits of dirt and sand).
  2. Simmer the sweet potatoes, leeks, water, and salt together, partially covered, for 40 to 50 minutes until the vegetables are tender; or, cook in a pressure cooker, under 15 pounds pressure for 5 minutes, release pressure, and simmer uncovered for 15 minutes.
  3. Mash the vegetables in the soup with a fork, or pass the soup through a food mill (you can also use a blender or a hand blender, but the soup will turn out smoother with a food mill).
  4. Set aside uncovered until just before serving, then reheat to the simmer.
  5. Turn off heat and, just before serving, stir in the cream or butter by spoonfuls.
  6. Pour into a tureen or soup cups and decorate with the herbs.

Take the road less traveled, Beth

Filed Under: Recipes Tagged With: Auguste-Antoine Parmentier, France, leek, potage parmentier, potato, sweet potato, Vichy, Vichyssoise

Armenian Matnakash Bread Recipe

September 18, 2013 by Beth Shepherd

Welcome to Armenia

Four years ago, this week, Big Papa and I visited Armenia for the first time and ate Armenian Matnakash Bread. This bread was our introduction to Armenian cuisine. I remember we arrived late at night and were very hungry. On the dining room table in the apartment where we were staying, our host had left food for us to snack on: wine, tiramisu, and Armenian Matnakash Bread.

Matnakash is a traditional soft  Armenian bread. The word matnakash literally means finger draw or finger pull, referring to the way the bread is prepared. Matnakash is made from wheat flour with yeast or sourdough starter. It is shaped into oval or round loafs with longitudinal or crisscrossed scoring. The characteristic golden or golden-brown color of its crust is achieved by coating the surface of the loaves with sweetened tea essence before baking.

In Soviet times, Matnakash was honored. In the 1930s, Soviet Armenia wanted to mark the new communist country with a more modern looking bread. The matnakash became a mass-produced urban bread. Even the bakers’ patterns on the bread was re-interpreted to fit the soviet agenda. It resembled a plowed field with rows and furrows. The bread’s rim was interpreted as an agricultural field and its imprinted lines as tilted rows.

Wherever we went, in grocery stores, bakeries and restaurants, we saw Matnakash bread. It is as much a staple today as it has been for generations. Matnakash will always have a special place in my heart because it was–literally–my first taste of Armenia.

Armenian matnakash bread

Matnakash (makes two loaves)

Ingredients:

  • 5 cups bread flour
  • 1 teaspoon active dry yeast
  • 1-1/2 teaspoons salt
  • 1/2 teaspoon sugar
  • 2 cups warm water (temperature about 105 -110 degrees)
  • 3 tablespoons extra virgin olive oil

How to:

  1. In a bowl, add all dry ingredients, stirring to combine. Add the water, and mix until a soft dough forms. On a lightly floured surface, knead the dough about 20 minutes.
  2. Place dough in a clean, lightly oiled bowl; cover with a clean towel and let it rise in a warm, draft-free place for about 1 hour.
  3. Moisten your hands with water, punch the dough lightly; stretch and fold the dough four times. Then cover it again and leave it in a warm place for another 30 minutes.
  4. Divide the dough into 2 equal parts.
  5. On a large open baking pan, pour the olive oil and stretch open the dough (one piece at a time) into an oval shape — making sure both sides are covered with oil.
  6. Let the dough sit for another 15 – 20 minutes.
  7. Preheat oven to 425.
  8. Fold all along the rim of the oval breads, gently tucking them in.
  9. With a fork, knife, or fingers, gently give the appropriate design of a plowed field — 5 to 6 lines lengthwise and 3 to 4 lines crosswise.
  10. Place the shaped dough on an baking pan (no grease) and bake until golden brown (about 20 minutes).

Take the road less traveled, Beth

Check out more comfort food on Wanderfood Wednesday!

Filed Under: Recipes Tagged With: bread, Matnakash

Bay Laurel Ice Cream Recipe

August 14, 2013 by Beth Shepherd


Bay Laurel tree

I was intrigued when I saw it on the menu at Marjorie Restaurant in Seattle: Bay Laurel Ice Cream. Just like the sage, thyme and lemon verbena ice creams I’ve made from herbs grown in our garden, I imagined how bay leaves, typically used as an aromatic or as a savory ingredient in soups and stews,  might translate into a creamy dessert.

Bay Laurel leaves

Bay leaves come from the bay laurel tree, which is native to the  Mediterranean. California bay leaves actually come from a different kind of tree and have a stronger, more astringent flavor. Bay is typically used to season long-cooking dishes like soups and braises, but it can also enhance the flavor of quicker-cooking dishes like risotto, pasta sauce, or even a simple pot of rice.

Bay is used most widely in Mediterranean cooking, but since it was one of the earliest and most widely traded spices, bay has become an established seasoning in many cuisines around the world. You can find bay in Indian dishes, Middle Eastern food, and many European cuisines (it is one of the main ingredients in classic French bouquet garni).

Does bay seem like a spice that would make delicious ice cream? Probably not, but now that I’ve tried it–and made a fresh batch at home–I can say that bay laurel ice cream is delightful.

We have a small bay laurel tree in our backyard so I am lucky to have fresh by leaves whenever I need them. The fresh leaves are nothing like dried leaves you buy in bottles at the grocery store, and if you can find them (farmers market or Whole Foods-type grocery store), they are amazing: tender, fragrant and full of sweet afternotes.

Bay Laurel Ice Cream

Bay Laurel Ice Cream Recipe

  • 2-3/4 cup whole milk (or half-and-half)
  • 3/4 cup heavy cream
  • 3/4 cup organic  sugar
  • 4 egg yolks
  • 8 fresh bay laurel leaves, sliced (can used dried if fresh leaves aren’t available at your local farmers market or Whole Foods-type grocer)
  • pinch of salt
  1. In a small saucepan, whisk together the milk, cream and 1/2 cup of sugar.  Add the bay leaves and bring to a boil over medium heat.
  2. Remove from heat, cover and let steep for 30-40 minutes.
  3. Strain the mixture through a fine mesh to remove the bay leaves. Bring back to a low simmer under medium low heat.
  4. Meanwhile, in a bowl whisk together the egg yolks, salt, and remaining 1/4 cup of sugar. In a slow steady stream, whisk in the hot milk mixture a little at a time. Pour the mixture back into the sauce pan and cook for a few minutes, stirring constantly, until it coats the back of a wooden spoon and you can draw a line through it.
  5. Strain the mixture through a fine mesh strainer and into a storage container. Chill in the refrigerator for several hours or overnight, until completely cooled.
  6. Freeze the ice cream in an ice cream machine to the manufacturer’s directions. Transfer to a container and freeze.
  7. Garnish with a small bay leaf if desired.

Take the road less traveled, Beth

Try more sweet treats and check out Wanderfood Wednesday!

Filed Under: Recipes Tagged With: Bay Laurel, Bay Laurel Ice Cream, Bay leaf, Bay tree, ice cream, Marjorie Restaurant

Patriotic Popsicle Recipe

July 2, 2013 by Beth Shepherd

Patriotic PopsiclesLegend has it that on July 4, 1776, when John Adams — who fought for independence and eventually because the second President of the United States — and his wife, Abigail, sat down for a meal to celebrate the birth of their independent country, they dined on turtle soup. The remainder of their meal included New England poached salmon with egg sauce, green peas, and boiled new potatoes in jackets. For dessert they enjoyed Indian pudding or Apple Pandowdy.

These days, turtle soup is a rarity, but at one time it was a summer delicacy. When the weather got warm, early Americans got their turtle-catching nets ready and headed down to the turtle pond, whereas in 2013, most families fire up a grill loaded with hotdogs and hamburgers. Our side dishes are grilled corn, coleslaw and potato salad, potato chips, and for dessert some say nothing is as “American as Apple Pie.”

In honor of our nation’s Independence Day, and the scorching summer many of us seem to be experiencing, I long for all things cool. So here it is: Patriotic Popsicles! In honor of the ‘ole red, white and blue these pops feature white chocolate, raspberries and blueberries. Have a sweet 4th (and HAPPY BIRTHDAY to Big Papa who was born on this day)!

Take the road less traveled,

Beth

Patriotic Popsicles-Raspberris and Blueberries

Patriotic Popsicle Recipe: White chocolate with raspberries and blueberries

Makes approximately six popsicles (depending on the size of your popsicle mold)

  • 1 1/3 cup (330ml) cream, half-n-half or whole milk (depending on how rich you’d like your popsicles to be)
  • 4 ounces (110g) white chocolate, finely chopped (Use good white chocolate if you can, instead of white chocolate chips. I used Green and Black’s Organic White Chocolate)
  • pinch of salt
  • 12-14 ounces (175g) mixed fresh or frozen berries (I just kept filling until the fruit was almost to the top of the mold)

Patriotic Popsicles-Raspberry, blueberry and cream


1. In a small saucepan, warm the milk, white chocolate, and salt over low heat, stirring, until the chocolate is melted.

2. Remove from heat and let cool to room temperature.

3. Fill the popsicles molds with berries, pour the white chocolate mixture over them, and rap them molds gently on the counter to release any air bubbles.

4. Freeze the popsicles until very firm (~6-8 hours).

Note: You could easily substitute any berries you like: cut strawberries, blackberries, etc.

Patriotic Popsicles-ready for freezing

For more patriotic deliciousness, check out Wanderfood Wednesday!

Filed Under: Recipes Tagged With: berries, Green and Black's Organic White Chocolate, patriotic, popsicle, white chocolate

Fennel coleslaw recipe

June 26, 2013 by Beth Shepherd

Fennel coleslaw

Summer–when ballgames, boating and picnics rule– is the quintessential season for potato salad and coleslaw. Whether you serve them alongside sandwiches or paired with the traditional combo of dogs, burgers and chips, it’s hard to imagine summer passing without a few opportunities to enjoy these two classic summer salads.

I created this twist on garden variety cabbage salad: Savoy or Napa cabbage instead of green cabbage, fennel as opposed to celery, and fennel seeds in place of caraway or dill seeds. I also lightened it up a bit by using Greek yogurt rather than the sour cream many recipes call for. Plus, I love the hint of tartness.

Never used (or heard of) Savoy or Napa cabbage? Savoy cabbage is the prettiest cabbage out there, in my opinion. The heads are shaped like green cabbage, but the leaves are dark green and deeply crinkled. Their flavor is mild and earthy, and the leaves are tender even when raw.

Napa cabbage, also called Chinese cabbage, is an oblong-shaped cabbage with thick, crisp stems and frilly yellow-green leaves. I think Napa is sweeter than green cabbage.

Both Savoy and Napa are more delicate and less rubbery than green or red cabbage typically used in coleslaw. Either will work in this recipe. You choose!

We sat on our back deck on a glorious warm Seattle (yes, it was!) evening and enjoyed our Fennel Coleslaw with Bison, homemade potato salad, homemade pickles (of course!) and Terra chips.

Fennel coleslaw, potato salad, pickles, bison hotdogs and chips

Fennel Coleslaw Recipe

INGREDIENTS

  • 1 small head of Savoy or Napa cabbage (about 1 pounds), chopped
  • 1 medium-sized fennel bulb, chopped (white portion)
  • 2 large carrots, grated
  • 1 teaspoon kosher salt, plus more for seasoning
  • 3-4 green onions, finely chopped (white and green portion of the green onions)
  • 1/4 cup cider vinegar
  • 1/4 cup mayonnaise
  • 1/4 cup Greek-style yogurt (like Fage)
  • A few tablespoons of fresh-squeezed lemon
  • 1 teaspoon Dijon mustard
  • 1 teaspoon granulated sugar
  • 1/2 teaspoon fennel seeds
  • 1/4 teaspoon freshly ground black pepper, plus more for seasoning
  • 2 medium carrots, peeled and grated on the large holes of a box grater
  • For some flair, add chopped fresh herbs like parsley, chives, or fresh fennel fronds

HOW TO

  1. Slice cabbage in half through the core. Cut a V-shaped notch around the white core on each half; discard the core. Slice each half lengthwise into quarters and thinly slice each quarter crosswise into 1/8-inch-wide strips.
  2. Place mayonnaise, yogurt, mustard, sugar, fennel seeds, lemon juice, vinegar, salt and pepper in a large bowl and stir to combine.
  3. Add the cabbage, fennel, grated carrots, and green onions to the bowl with the dressing. Add grated carrots and reserved onion-vinegar mixture and toss to combine. Season with additional salt and pepper as needed. Serve immediately or keep refrigerated in a tightly sealed container for up to 1 day.

Note: If you want to avoid the moisture that plagues most coleslaw, salting the cabbage and letting it sit helps draw out some of moisture. It takes a bit more time, but this is how you do it:

  1. Slice cabbage in half through the core. Cut a V-shaped notch around the white core on each half; discard the core. Slice each half lengthwise into quarters and thinly slice each quarter crosswise into 1/8-inch-wide strips.
  2. Place cabbage in a large colander set over a large bowl or plate, sprinkle with 1-1/2 teaspoons salt, and toss to coat. Place a heavy bowl on top of the cabbage, then place a heavy can or two in the bowl to weigh it down. Let sit until cabbage has released about 1/4 cup of moisture, at least 1 hour.
  3. When cabbage is ready, squeeze large handfuls to release any excess liquid, place in the large bowl and continue with the recipe.

Want to salivate over more seasonal deliciousness? Check out Wanderfood Wednesday.

Filed Under: Recipes Tagged With: Fage yogurt, fennel, Fennel coleslaw, Napa cabbage, Savoy cabbage

Corn, tomato, and fresh pea salsa recipe

June 12, 2013 by Beth Shepherd

Corn, tomato and fresh pea salsa‘Tis the season: garden-fresh vegetables are here! Whether they’re harvested from your own backyard or found at the local farmers market, there is nothing like the flavor of vine-ripened tomatoes, peas straight from the pod and newly husked corn.

Corn, tomato and peas—some variation of this vegetable trifecta always finds its way to our table. Last night I served Corn, tomato and fresh pea salsa along with steamed rice and pan-cooked Tilapia. Summer in a salsa!

Corn, tomato, and fresh pea salsa recipe

Ingredients:

  • 3 ears corn
  • 1 pint cherry or grape tomatoes
  • ½ cup shelled peas (frozen peas can be substituted)
  • ½ sweet onion, like Vidalia
  • 1 jalapeno
  • A few tablespoons fresh herbs: basil, parsley and chives are my favorites for this recipe
  • 1 lime
  • Olive oil
  • Sherry vinegar
  • Salt

How to:

  1. Cut the kernels off of the three corn cobs.
  2. Cut the cherry tomatoes in half.
  3. Shell peas.
  4. Mince sweet onion.
  5. Cut jalapeno in half and scoop out the seeds. Mince jalapeno and use half to all of it depending on how much of a kick you want in your salsa.
  6. Finely chop herbs (you can use a single herb, like basil or combine several together).
  7. Put 2 tablespoons of oil in a skillet and when the oil is hot, sauté the corn kernels until slightly browned (this is optional but I like the flavor). Cool.
  8. When cool mix together: corn, cut tomatoes, peas, minced onion, herbs and and the juice from one lime.
  9. Drizzle with olive oil and a few splashes of sherry vinegar.

Note: There are infinite variations to this recipe. Omit the jalapeno. Use balsamic vinegar instead of sherry vinegar. Mix in chopped arugula instead of herbs.

Want to check out a medley of more deliciousness? Check out Wanderfood Wednesday!

Filed Under: Garden, Recipes Tagged With: corn, pea, salsa, tomato, Vidalia, Walla Walla onions

Gluten-free Pizza Recipe – with caramelized onions, pear and herbed goat cheese

June 5, 2013 by Beth Shepherd

Udi's gluten-free pizza Gluten-free pizza with caramelized Walla Walla onions, pear and herbed goat cheese

After our recent trip to Walla Walla, I’ve got onions on my mind. And, in keeping with my gluten-free experimentation phase, I decided to give pizza a whirl. Okay, I didn’t make the crust. Udi’s did. However, the Walla Walla sweet onions and the herbs used in the herbed goat cheese were grown right outside my back door. Now all I need is a goat.

Take the road less traveled,

Beth

Gluten-free pizza with caramelized Walla Walla Onions, pear and herbed goat cheese recipe

Note: This pizza crust is very thin.

Ingredients:

  • One Udi’s gluten-free pizza crust (they come in a package of two), defrosted
  • 1/2 cup caramelized onions (recipe below)*
  • 1/2 cup herbed goat cheese (recipe below)*
  • 1/2 pear, thinly sliced
  • Olive oil
  • Optional: drizzle of aged Balsamic vinegar
  • Optional: chive blossoms

*Amounts can be varied to suit  your taste

How to construct your pizza:

  1. Preheat oven to 375 (per Udi’s directions).
  2. Line a baking sheet with parchment paper and place the crust on top.
  3. Brush crust with olive oil.
  4. Spoon caramelized onion onto the pizza crust and spread it out evenly.
  5. Place pear slices in a circle on top of the caramelized onions.
  6. Drop small spoonfuls of herbed goat cheese all over the pizza.
  7. Bake for 7-10 minutes until crust is golden.
  8. Before serving, sprinkle a handful of chive blossoms on top.
  9. Slide onto cutting board and slice.

Walla Walla onions and herbed goat cheese

Caramelized Onions* (Note: This recipe makes enough caramelized onions for one small pizza. If you want to make a bigger pizza, or two pizzas, double the recipe)

Ingredients:

  • 1 tablespoon unsalted butter
  • 1 tablespoon vegetable oil* (You can also use 2 T oil and skip the butter)
  • 1/2 pound of Walla Walla or sweet Vidalia onions (roughly 1 medium onion; my garden Walla Wallas were much smaller so I used more)
  • 1 teaspoon brown sugar
  • 1 tablespoon water

How to Caramelize Onions:

  1. Cut the Walla Walla onions into thin slices. I personally like to cut my onions into rings.
  2. Add the butter and oil to a cold non-stick skillet; melt butter over high heat.
  3. Once the butter melts, stir in the onions and brown sugar.
  4. Let the onions cook; stir on occasion until the onion soften down and are slightly wilted. This should take about 5 minutes.
  5. Reduce the heat to medium and cook. Stir often until the onions turn deep brown in color. Depending on the amount of onions you use, it can take up to 50 minutes to cook down and caramelize onions. Patience is a virtue.
  6.  Once the onions are caramelized and you achieve the color you are looking for take it off the heat. I like mine mahogany colored.

Note: Don’t stare at the clock. Instead, pay close attention to the pan. If you want caramelized onions, not burnt onions (which I have made on occasion), stir often and check to make sure the onions are not getting burnt. I can’t stress this enough. Once the onions start to brown, they can burn quickly. You’ve been warned.

Herbed Goat Cheese

Ingredients:

  • Log of goat cheese
  • Olive oil
  • Herbs (assortment that might include any/all of the following: thyme, basil, rosemary, chives, sage, parsley), a few tablespoons chopped.

How to:

  1. Put a log of goat cheese in a bowl; add a healthy drizzle of olive oil and mix in a few tablespoons of minced, fresh herbs.

Want to drool over more deliciousness? Check out Wanderfood Wednesday!

Filed Under: Garden, Recipes Tagged With: chive blossoms, Gluten-free, goat cheese, pears, pizza, Udi's gluten-free pizza, Walla Walla, Walla Walla sweet onions

  • « Previous Page
  • 1
  • 2
  • 3
  • 4
  • …
  • 6
  • Next Page »

Some might fend off a mid-life crisis by leaving the comforts of their corporate salary to jet off to a deserted island. Others might buy a Jaguar. I’ve chosen to dive head-long into my 50s and beyond by becoming a first-time parent. At any given moment you might find me holding a camera, a spade, a spatula or a suitcase. Or my little girl's hand. Adopted from Armenia, she puts the Pampers and Paklava into my life.

Subscribe to Blog via Email

Enter your email address to subscribe to this blog and receive notifications of new posts by email.

Recent Posts

  • Ghosts and goblins of Halloweens past
  • Raise a glass—or ten
  • No me without her: A life before motherhood
  • Leaving the orphanage with a priceless pair of tights
  • Rock of ages: Celebrating five years together as a family

Tags

366 Project Adoption anniversary Armenia autumn Bainbridge Island Baja Birds birthday blog cat cats chickadee China Christmas fall ferry flowers France Garden Gyumri Halloween Hawaii Holiday ice cream Kauai leaves London Mamas with Cameras Mexico Mother's Day Mt. Rainier New York orphanage Paris Puget Sound robin Seattle taxi Thanksgiving Tibet USCIS Valentine's Day wedding Yerevan

Categories

  • Adoption
  • Armenia
  • Family
  • Food
  • Friendship
  • Garden
  • Holiday
  • Miscellaneous
  • Paris
  • Photography
  • Recipes
  • Review
  • Seattle
  • Things to do with kids
  • Travel

Sites I like

  • The Wayfaring Voyager
  • Wanderlit
  • Wanderlust and Lipstick
follow us in feedly

Image Copyright

Unless specifically mentioned, all images on my blog are my own original photographs and, therefore, copyright protected (©Beth Shepherd). Feel free to use my images for non-commercial use so long as you provide me with the image credit. Likewise, if you pin my images to Pinterest, please mention me by name.

Copyright © 2026 · Pamperspaklava · WordPress Barista