Pampers and Paklava

  • Home
  • Photography
  • Travel
  • Food
  • Garden
  • Contact

St. Paddy’s Potatoes: How to grow container potatoes

March 10, 2016 by Beth Shepherd

Have a small garden? Maybe just a sunny porch? Love potatoes? If you are a small space gardener, like I am, growing potatoes in a container is the way to go! Tupperware bin or even a burlap bag, it’s easy to grow your own spuds. I like to grown mine in big garbage bins!

Container potatoes

You’ll want to start your plants after all danger of frost has passed. I live in the Seattle and the climate is somewhat mild, so St. Patrick’s Day is when I plant. Yes, I admit there’s a twisted irony to planting potatoes on St. Paddy’s because, well, there was that potato famine. But for me it’s a good reminder: St. Paddy’s—->Irish potato famine—>plant potatoes.

Want to try it? Start with seed potatoes, not the leftovers from Sunday’s dinner. You can buy them at most garden stores and they are preferred because there is less chance of disease (again see Potato Famine).

Select a potato variety that works with your growing season. There are three basic categories: early, mid and late season.  You can find suggestions on which varieties to try, based on your growing season, in this great article about potato varieties. This year I’m growing Germain Butterballs and Ozettes. German Butterball potatoes are tender and, like their name, buttery. The flavorful, but lumpy, Ozette potato is our local star. Brought to the Pacific Northwest from Peru by Spanish galleons. Even if they won’t win any awards for beauty, I love their rich, nutty flavor!

Small seed potatoes can be planted whole, but cut larger ones into 2-inch pieces, making sure there are several eyes on each piece. Plant the pieces in your container-of-choice by placing them about 5-7 inches apart on about 4-inches of  free-draining soil mixture with a small handful of fertilizer added in.

Cover your potatoes with more soil and then, after the plants grow about 6-inches, continue to cover the them until you reach the top of your container. You have to do this somewhat carefully, in my opinion, so as not to break the newly growing plants. You’ll want to keep your plants watered but don’t over-water lest you end up with soggy plants. Also, be sure to cut or drill holes for drainage into your container if it didn’t ‘t come with drainage holes to begin with.

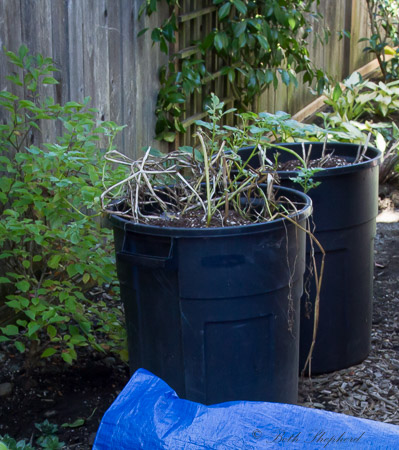
For best results, place your container where the plants will get six to eight hours of light and temperatures of around 60 degrees Fahrenheit. You’ll know it’s time to harvest when your plants flower and then turn yellow. You can also remove new potatoes before flowering. Once the stems turn yellow, stop watering and wait a week.

Yellow and dry potato plants

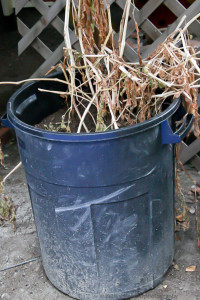
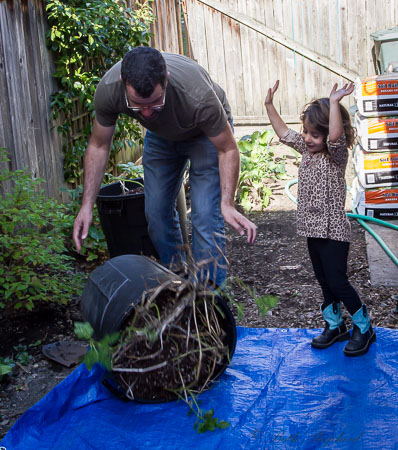
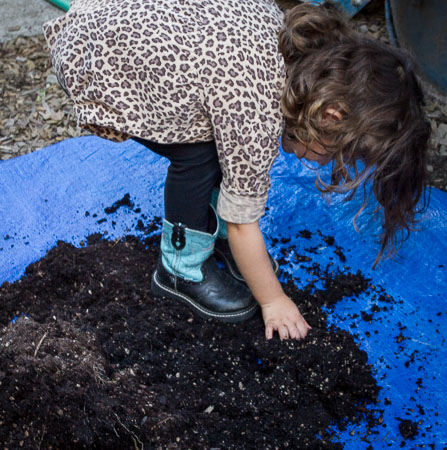
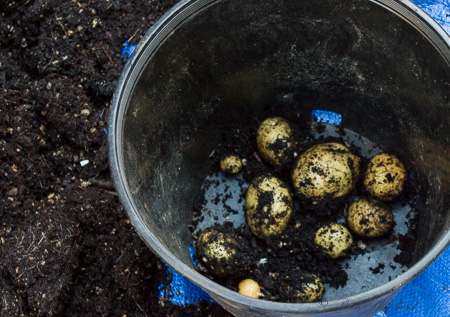
Dig out the potatoes or just dump the container and sort through the soil for the tubers. Brush dirt off the potatoes (but don’t wash them in water until you’re ready to eat them) and let them “cure” for two weeks in a cool, dark spot (like a basement). Our family has a great time at our annual “potato dumping.” We haul out a tarp and tip over the cans. It’s great fun for little kids to dig around in the dirt, collect and count their haul.

Potato harvesting

Important note: You can reuse potato soil in your garden, just NOT in vegetable beds (flowers and other plants are okay). This is because they are in the nightshade family (like tomatoes) and the spent soil is more likely to cause disease in other vegetables, if you use it again.

Container potatoes

Go forth–plant potatoes! And Happy St. Paddy’s.

It’s all about the journey,

Beth

Filed Under: Holiday Tagged With: potato, potatoes, St. Patrick's Day

Potato Fest 2014

October 24, 2014 by Beth Shepherd

There’s nothing like a potato fresh from the garden, or garbage bin! Yes, that’s right, we grow our spuds inside a plastic garbage can. if you want to learn how to do this yourself, you can read a post I wrote a few years ago, here.

Potato crop

This year’s crop was not one of our finest, but that didn’t stop Little Bird from enjoying the annual fall “dumping.”  After a season of grown, the plants have died back which means it’s time to dump them out and scour the soil for potatoes (Note:You can reuse the soil in flower beds, just not in garden beds where other edibles are growing).

Two buckets of potatoes

Whoop. Whoop. There they go! This part always feels magical to me, because–unlike vegetables that grow above ground–you can’t see tubers growing, so you don’t know what kind of crop you’ve got until the can goes over.

Dumping the potatoes

We always dump our garbage bin onto a tarp. This way, it’s easy to sift through the soil, pick out the potatoes and then pour the soil back in the garbage bins for later use elsewhere in the garden.

Searching for potatoes

Found one! The potato treasure hunt is on.

Potatoes discovered

Into the bucket they go, one by one. I’ll brush them off and store them in a cool, dry place to harden them off a bit (assuming I have enough to do that, otherwise we just wash and eat them).

Potatoes in the bucket

Potatoes

And there goes potato harvest 2014. Until next spring…

Take the road less traveled, Beth

Filed Under: Garden Tagged With: potatoes

Tooting our tubers: Potatoes in a garbage can 2012

October 3, 2012 by Beth Shepherd

Four years running, Big Papa and I have grown potatoes in a plastic garbage can. This year, our crop of rose fingerlings produced 62 fine looking potatoes. I get so jazzed when we are about to dump the can, because you never know how many potatoes you’ll get. The whole tuber process seems magical: seed potatoes go in the can, soil goes on top, a green plant grows, flowers and dies. And then, in the depth of the deep, dark dirt…POTATOES!

In my 2010 post, I wrote about how I looked forward to [one day] sharing future potato harvests with our kiddo. Well, guess what? Baby Bird got her hands dirty and helped. She’s already a potato fan, where eating them is concerned. I’m willing to bet she’ll enjoy being involved in potato harvests for years to come!

Here are some shots from this year’s potato festivities:

Potatoes growing in the garbage pailPotatoes growing in a plastic garbage can. Kinda pretty, huh? The flowers are cool too.

Dumping the potatoesDumping the potatoes onto a tarp. See how much the stalks died back. Not so pretty anymore.

Here's our potato cropHere’s our potato crop. Look at them! Earthy jewels.

2012 rose fingerling potatoes2012 Rose Fingerling potatoes. 62 in this year’s crop…a few biggins’ too.

First time with home grown potatoesBaby Bird’s first home grown potatoes!

Dumping the potato soilBecause the potato plant is a member of the nightshade family, it’s not a good idea to reuse the soil to plant potatoes, tomatoes, peppers or eggplant because the soil may harbor insects or disease from this season’s crop (remember the Irish potato famine). We dump ours in the recycle bin but I’ve heard you can reuse the soil in flower gardens.

Rose fingerlings ready for eatingRoasted and ready!

Wanna grow your own? Here’s a link to my how-to post: One potato, two potatoes, three potatoes, four

And if you want to find more food to toot about, check out Wanderfood Wednesday!

Filed Under: Food, Garden Tagged With: plastic garbage can, potatoes, rose fingerlings

Bangers and mash with Walla Walla gravy recipe

May 23, 2012 by Beth Shepherd

Bangers and mashWhen I first met Big Papa, I was having a crown put on one of my teeth. As I bemoaned my inability to eat much of anything toothier than mush, he assured me, “Chewing is overrated.” That’s when I found out mashed potatoes rate as one of Big Papa’s favorite dishes. Sausages easily make it into his top five. So this March, when our travels to Armenia included a couple days in London on the way over, I knew that if we ate nothing else, we’d eat bangers and mash.

Bangers and mash are quintessential British pub food, eaten in homes for centuries but first served up in English pubs around WWI as a cheap and filling lunchtime meal for the working class. “Bangers,” sausages, and “mash,” potatoes are served up with a healthy slathering of rich onion gravy.

Bangers take their name from the sound sausages can emit when fried. Modern sausages apparently don’t make the loud “bang” sausages pre-WWII did when they were overheated because today’s meats are generally made with less water.

We tried bangers and mash at several London locales and they did not disappoint. How could they really? Bangers and mash, with a good pint of ale alongside, are comfort food at its finest.

Here’s my northwest take on onion gravy, made using succulent Walla Walla sweet onions. Paired with some locally grown potatoes and homemade sausage (one of the latest “it” foodie items easily found in Seattle), and our recent spate of gray days and drizzle, blimey if it doesn’t feel like jolly old England.


Caramelized Walla Walla Onion Gravy
Ingredients

  • 3 cups thinly sliced Walla Walla onions (or other Vidalia-type sweet onion)
  • 2 tablespoons butter
  • 1 tablespoon light brown sugar
  • 1 teaspoon garlic
  • 1 teaspoon thyme leaves (fresh if possible)
  • 2 tablespoons cognac (optional)
  • 1 cup beef or chicken stock
  • salt and pepper


How to:

  1. In a small saucepan set over medium heat, add the butter.
  2. Once melted, add the onions and sugar to the pan and saute, stirring occasionally until wilted and well caramelized, about 18 to 20 minutes.
  3. Add the garlic and thyme to the pan and saute until fragrant, about 30 seconds.
  4. Add the flour to the pan and stir to make a roux, about 2 to 3 minutes.
  5. De-glaze the pan with the cognac and once nearly evaporated, 1 minute, add the chicken stock.
  6. Bring to a boil and reduce heat to a simmer.
  7. Simmer the gravy for 15 minutes and season with the salt and pepper.

Want more bang in your week? Check out Wanderfood Wednesday!

Filed Under: Recipes Tagged With: bangers and mash, British, England, London, pint, potatoes, sausages, sweet honion, Walla Walla onions

Eat your “P’s”: Plums, Pork, Potatoes, and Pinot on the Porch

September 14, 2011 by Beth Shepherd

Greengage plumsLast week I wrote about the amazing Plum Chutney I made with the plums I picked from our Greengage plum trees. It was a delicious accompaniment to the pork we got from La Boucherie at our local farmers market. We quaffed a delicious Foxen Winery Pinot Noir that paired perfectly with our pork and plum chutney, and for a side dish we enjoyed our first homegrown (in a plastic garbage can!) rose fingerling potatoes of the season. To top it all off, our porch-side dessert featured more plums in the form of a crumble.

Eat your “P’s!” No complaints on that at the Urban Cabin.

Plum Crumble with Hazelnuts and Crystallized Ginger (Serves 6-8)

*You could adapt this recipe using many types of fruit. In the past I’ve made it with peaches and also pears. Of course, my personal favorite is crumble with Greengage plums.

For topping

  • 1 cup unbleached all purpose flour
  • 2/3 cup old-fashioned oats
  • 2/3 cup (packed) golden brown sugar
  • 1 teaspoon ground cinnamon
  • 1/8 teaspoon salt
  • 1/2 cup (1 stick) chilled unsalted butter, cut into 1/2-inch pieces
  • 1/3 cup toasted hazelnuts (chopped)

Greengage plum crumbleFor filling

  • 3 pounds firm but ripe plums (I used Greengage, but any plum will do), pit removed, cut into 1/4-inch-thick slices (or chopped roughly)*
  • 2 tablespoons fresh lemon juice
  • 1/3 cup sugar
  • 2 tablespoons minced crystallized ginger (I use more because I really like the extra kick from gingery flavor)
  • 1 1/2 tablespoons unbleached all purpose flour

Preparation

Make topping:
Preheat oven to 375°F. Butter 13 x 9 x 2-inch glass baking dish (you can also use a smaller baking dish, I have, and you’ll have a deeper crumble). Mix first 5 ingredients in medium bowl. Add butter and rub in with fingertips until moist clumps form.

Make filling:
Combine plum slices and lemon juice in large bowl. Add remaining ingredients and toss to blend.

Transfer filling to prepared dish. Sprinkle topping over. Bake crumble until plum are tender and topping is golden brown and crisp, about 45 minutes. Cool at least 20 minutes. Serve warm or at room temperature. We enjoyed our crumble with homemade sage ice cream, but store-bought vanilla works too!

Greengage plum crumble with sage ice cream

Want more perfect goodness? Check out Wanderfood Wednesday!

Filed Under: Food, Garden Tagged With: Foxen Winery, greengage plums, La Boucherie, Pinot, plums, pork, potatoes, rose fingerling

Some might fend off a mid-life crisis by leaving the comforts of their corporate salary to jet off to a deserted island. Others might buy a Jaguar. I’ve chosen to dive head-long into my 50s and beyond by becoming a first-time parent. At any given moment you might find me holding a camera, a spade, a spatula or a suitcase. Or my little girl's hand. Adopted from Armenia, she puts the Pampers and Paklava into my life.

Subscribe to Blog via Email

Enter your email address to subscribe to this blog and receive notifications of new posts by email.

Recent Posts

  • Ghosts and goblins of Halloweens past
  • Raise a glass—or ten
  • No me without her: A life before motherhood
  • Leaving the orphanage with a priceless pair of tights
  • Rock of ages: Celebrating five years together as a family

Tags

366 Project Adoption anniversary Armenia autumn Bainbridge Island Baja Birds birthday blog cat cats chickadee China Christmas fall ferry flowers France Garden Gyumri Halloween Hawaii Holiday ice cream Kauai leaves London Mamas with Cameras Mexico Mother's Day Mt. Rainier New York orphanage Paris Puget Sound robin Seattle taxi Thanksgiving Tibet USCIS Valentine's Day wedding Yerevan

Categories

  • Adoption
  • Armenia
  • Family
  • Food
  • Friendship
  • Garden
  • Holiday
  • Miscellaneous
  • Paris
  • Photography
  • Recipes
  • Review
  • Seattle
  • Things to do with kids
  • Travel

Sites I like

  • The Wayfaring Voyager
  • Wanderlit
  • Wanderlust and Lipstick
follow us in feedly

Image Copyright

Unless specifically mentioned, all images on my blog are my own original photographs and, therefore, copyright protected (©Beth Shepherd). Feel free to use my images for non-commercial use so long as you provide me with the image credit. Likewise, if you pin my images to Pinterest, please mention me by name.

Copyright © 2026 · Pamperspaklava · WordPress Barista