Pampers and Paklava

  • Home
  • Photography
  • Travel
  • Food
  • Garden
  • Contact

Gluten Free Gnocchi Margherita Recipe

September 8, 2015 by Beth Shepherd

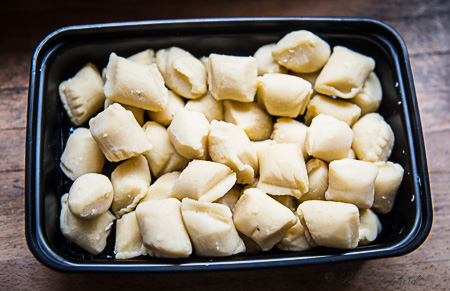
I’m always on the lookout for new gluten free products since Big Papa can’t eat wheat. When I saw Cappello’s Gluten Free (and dairy, grain and soy free) gnocchi at our local Central Coop, I was pretty excited.

Cappellos gluten free gnocchi

Although gnocchi, soft dough dumplings are typically made with potato as a base, wheat flour is also added. Cappello’s gnocchi uses potato flakes, along with almond flour and tapioca flour so not only is it gluten free, it’s grain free.

Potato flakes and almond flour gnocchi Cappello's

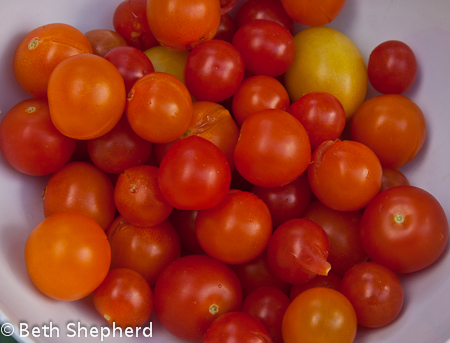
Gnocchi aside, I had a bowl full of garden fresh tomatoes and plenty of fresh basil longing to be featured in a dinner recipe. And, home-grown garlic!

ally and garden tomatoes

Wallingford was my tomato inspector. He thought they looked pretty tasty. A tomato eating cat? Don’t put it past him. He ate cooked mushrooms last week.

Wally and garden tomatoes, basil and mozzarella

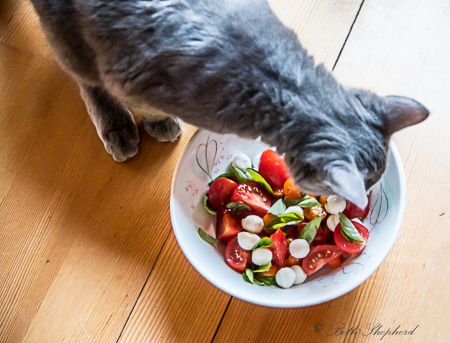
Of course the addition of mozzarella cheese balls made this dish irresistible to our feline family member, so Wally had to sit out the rest of dinner prep in the bathroom.

Capellos gluten free gnocchi Margherita

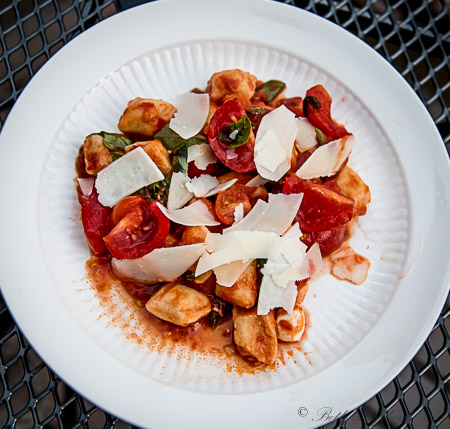
So delicious! Summer on a plate. Here’s the recipe:

Gnocchi Margherita

Ingredients:

  • 12 ounce packaged or homemade gnocchi
  • 2 cups halved cherry  or other small to medium-size tomatoes
  • 1 cup mozzarella bocconcini  (1 inch diameter mozzarella balls) or cilegine (cherry-size balls).
  • 1/4 cup olive oil
  • 2 tablespoons minced garlic
  • 1/2 cup thinly sliced fresh basil
  • 1/2 cup tomato sauce–optional, but I wanted a bit more tomato-y goodness and I love our local Cucina Fresca Marinara
  • salt, black pepper, and red pepper flakes to taste
  • fresh basil or garnish
  • shaved (or grated) Parmesan for garnish (or Asagio and Romano, I use a combination)

How to:

  1. Place the cut tomatoes and mozzarella in a bowl and set aside.
  2. Cook the gnocchi according to the package directions. Drain and set aside.
  3. Warm 1/2 cup tomato sauce (optional).
  4. Heat the oil in a skillet over medium-low heat. Add the garlic and cook until fragrant, about 1 minute. Remove from heat.
  5. Add the garlic-infused oil to the pasta and then toss in the tomato mozzarella mixture.
  6. Stir in the tomato sauce (if using).
  7. Stir in basil.
  8. Season with salt, black pepper and red pepper flakes.
  9. Garnish with fresh basil and shaved Parmesan.

Facelli Sangiovese 2009

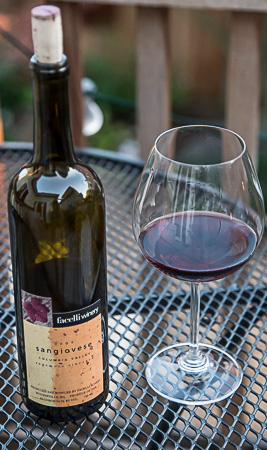
All that was needed was a bottle of wine to pair with our Gnocchi Margherita and Facelli Winery’s 2009 Sangiovese fit the bill. A bit of fruit, light tannins and enough acidity to stand up to our delicious cherry tomatoes. The perfect pasta wine!

And if you want to read more about all things Pampers, follow me on Facebook, Twitter or RSS/email.

Take the road less traveled, Beth

Filed Under: Recipes Tagged With: basil, Facelli, gnocchi, tomatoes

End-of-summer tart recipe

October 5, 2011 by Beth Shepherd

Garden fresh tomatoesFor the past three years, Big Papa and I have found ourselves abroad in September. While I love to travel, the fact is September in Seattle is glorious. The days are warm and clear; the mountains are crisp and in view; and, there is an abundance of fresh local bounty—right in our very own backyard.

Our cool maritime climate inevitably delays many crops until the cusp of fall. So I’ve felt considerable angst as we’ve headed out of town just when everything is finally ripe…our tomatoes in particular.

This September we managed to stay put. Despite the sorry excuse for a summer we experienced in Seattle this year, the weather over the past few weeks has been spectacular. Our plants couldn’t be happier. To celebrate, I decided to pick some of the best of the bunch and feature them in a tart.

End-of-summer tart makes use of the same basic recipe that I wrote about a few weeks ago (Channeling my inner Martha: Zucchini Tart), but changes up the zucchini topping for colorful medley of halved cherry tomatoes, caramelized Walla Walla onions, and a sprinkling of fresh basil. Sungold tomatoes (always a winner in our garden) taste sugary sweet and play nicely with the caramelized onions. The bright notes from the fresh basil offer a bit of herbal balance.

Tomato and Caramelized Wala Walla onion tartHere’s to summer in Seattle…even if we had to wait until September to enjoy it!

End-of-summer-tart

Recipe makes one 10-by-15-inch tart. Use an inverted backing sheet in the oven helps give the tart an extra-crisp crust.

Tart Ingredients

  • 1 stick unsalted butter, melted
  • 9 sheets frozen phyllo dough (12 by 17 inches) thawed (I think I ended up using more)
  • 6 large eggs, lightly beaten
  • ¾ cup heavy cream
  • ¾ cup whole milk
  • ½ cup finely grated Parmesan cheese (about 1-1/2 ounces)
  • 1/3 cup fresh basil, cut into strips
  • 2 cups of cherry tomatoes, sliced in half
  • Caramelized Onions (see recipe below)

Caramelized Onions

Ingredients

  • 1 tablespoon unsalted butter
  • 1 tablespoon vegetable oil
  • 2 pounds Walla Walla onions (About 4 medium-sized onions), halved and sliced thin (I like to cut mine “round,” not sliver moon shaped)
  • 1 teaspoon brown sugar
  • Salt
  • 1 tablespoon water
  • Black Pepper

How to Caramelize Onions

1. Add butter and oil to a cold non-stick skillet; melt the butter over high heat.

2. Once the butter melts, stir in the onions, brown sugar, and ½ teaspoon of salt.

3. Let it cook, stir on occasion until the onion softens down and is slightly wilted. This should take about 5 to10 minutes.

4. Reduce the heat to medium and cook, stir often until the onions turn to deep brown color. It usually takes me about 40 to 50 minutes to cook down and caramelize the onion. Patience is a virtue.

5. Once the onions are caramelized and you achieve the color you are looking for take it off the heat. I like mine mahogany colored. Add a dash of water and season it with salt and pepper.

Note: Don’t stare at the clock. Instead pay close attention to the pan. If you want caramelized onions, not burnt onions, keep stirring often and check to make sure it is that the onions are not getting burnt. I can’t stress this enough. Once the onions start to brown, they can burn quickly. You’ve been warned.

How to make the tart

1.  Preheat oven to 425 degrees, and place an inverted baking sheet on the middle rack.  Brush a 10-by-15 inch rimmed baking sheet with butter.

2.  Brush 1 phyllo sheet with butter, and overhand (keep remaining phyllo covered with plastic wrap as you work). Top with a second phyllo sheet in a slightly different position and brush with butter.  Repeat with remaining phyllo and butter, creating a crust with a 1-inch overhand on all sides.  Fold edges under to double the thickness. (Don’t worry if some pieces crack along the edge.)

3.  Whisk together eggs, cream, milk, Parmesan cheese, basil, 1 1/2 teaspoon salt, and 1/4 teaspoon pepper.

4.  Crumple 6 layers of foil into a rectangle the size of the tart, and fit into crust.  Bake crust, set on inverted sheet, until edges are golden, 7 to 8 minutes.  Remove foil.  Bake until surface is golden, 4 to 5 minutes.

5.  Immediately pour custard carefully into crust (do not overfill).  Slather caramelized onion evenly over the top and then distribute cherry tomato halves round side up all over the tart.  Bake on inverted sheet until custard is set in center, 20 to 22 minutes.  Immediately slide tart onto wire rack, lifting from one end using a large, wide spatula.  Let cool for 10 minutes before serving.

Slice of Tomato-Walla Walla Tart

Want to celebrate more deliciousness? Check out Wanderfood Wednesday!

Filed Under: Garden, Recipes Tagged With: carmalized onions, tart, tomatoes

Some might fend off a mid-life crisis by leaving the comforts of their corporate salary to jet off to a deserted island. Others might buy a Jaguar. I’ve chosen to dive head-long into my 50s and beyond by becoming a first-time parent. At any given moment you might find me holding a camera, a spade, a spatula or a suitcase. Or my little girl's hand. Adopted from Armenia, she puts the Pampers and Paklava into my life.

Subscribe to Blog via Email

Enter your email address to subscribe to this blog and receive notifications of new posts by email.

Recent Posts

  • Ghosts and goblins of Halloweens past
  • Raise a glass—or ten
  • No me without her: A life before motherhood
  • Leaving the orphanage with a priceless pair of tights
  • Rock of ages: Celebrating five years together as a family

Tags

366 Project Adoption anniversary Armenia autumn Bainbridge Island Baja Birds birthday blog cat cats chickadee China Christmas fall ferry flowers France Garden Gyumri Halloween Hawaii Holiday ice cream Kauai leaves London Mamas with Cameras Mexico Mother's Day Mt. Rainier New York orphanage Paris Puget Sound robin Seattle taxi Thanksgiving Tibet USCIS Valentine's Day wedding Yerevan

Categories

  • Adoption
  • Armenia
  • Family
  • Food
  • Friendship
  • Garden
  • Holiday
  • Miscellaneous
  • Paris
  • Photography
  • Recipes
  • Review
  • Seattle
  • Things to do with kids
  • Travel

Sites I like

  • The Wayfaring Voyager
  • Wanderlit
  • Wanderlust and Lipstick
follow us in feedly

Image Copyright

Unless specifically mentioned, all images on my blog are my own original photographs and, therefore, copyright protected (©Beth Shepherd). Feel free to use my images for non-commercial use so long as you provide me with the image credit. Likewise, if you pin my images to Pinterest, please mention me by name.

Copyright © 2026 · Pamperspaklava · WordPress Barista